Wednesday, August 4, 2021

Project 03: Week 04 Final Presentation

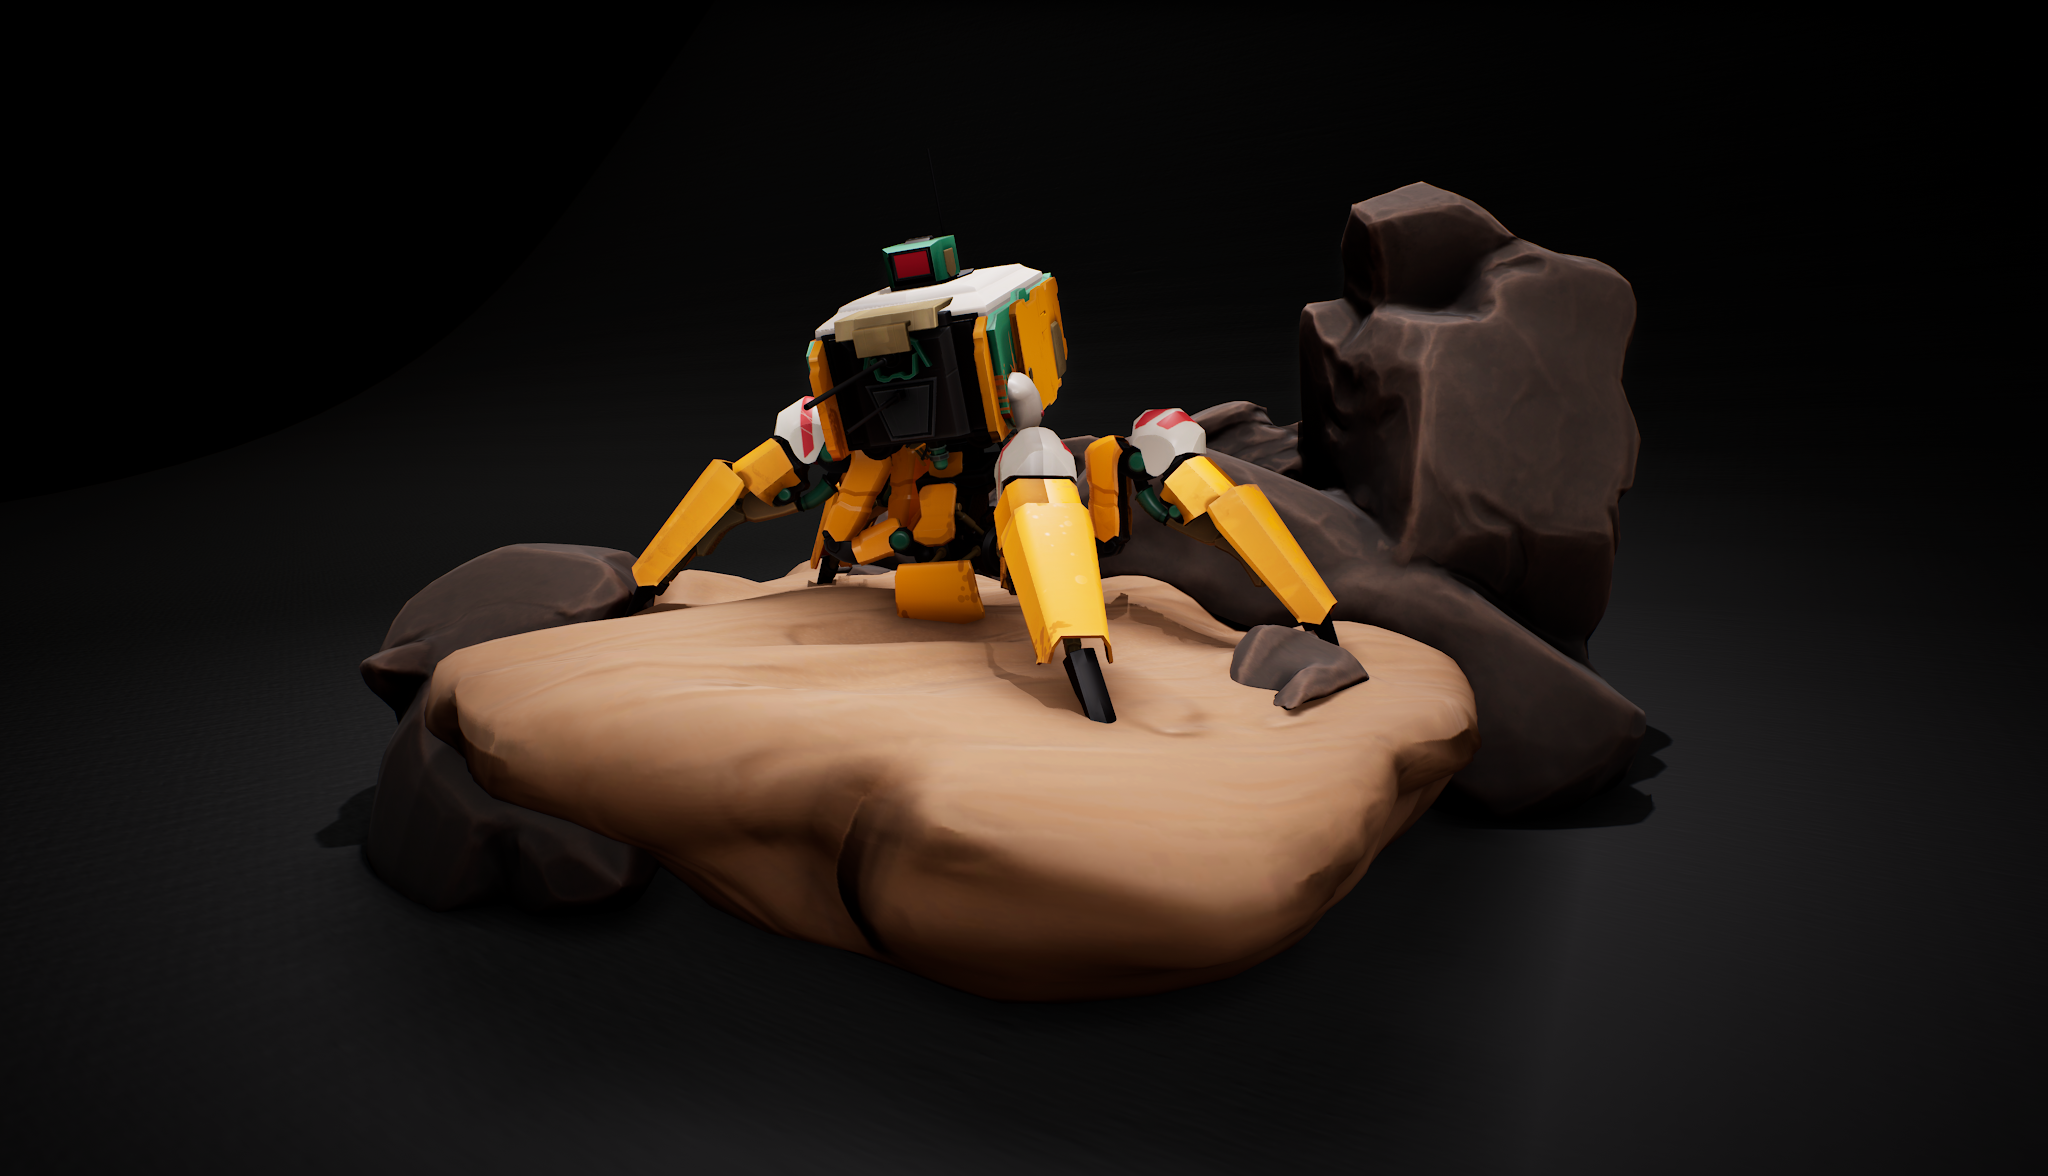
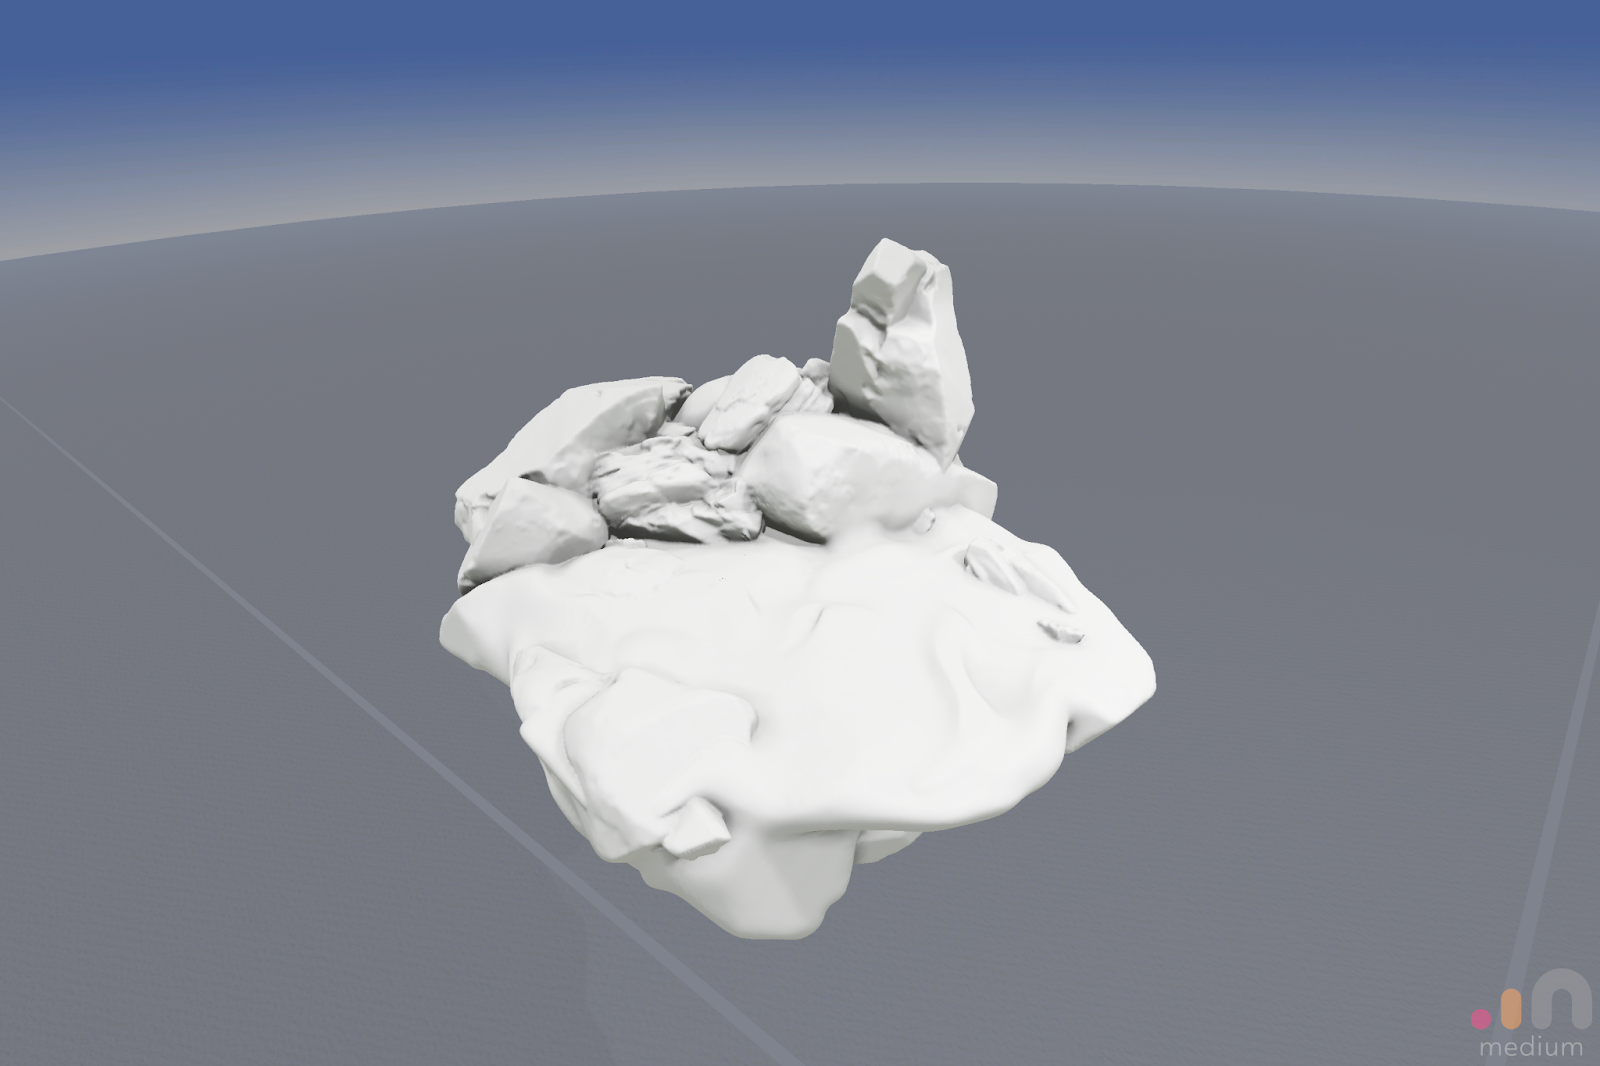
 As I prepare for final industry review I have imported all textures and models into UE4 and rendered out some images. I will spent some more time on the textures and consider this a WIP and not a finalized project. I want to get the geometry as efficient as possible and remodeled in some parts to work as a buildable 3d print as well as the base. I want to take the new geo that was created in Zbrush back into medium and practice getting more comfortable with that program. 


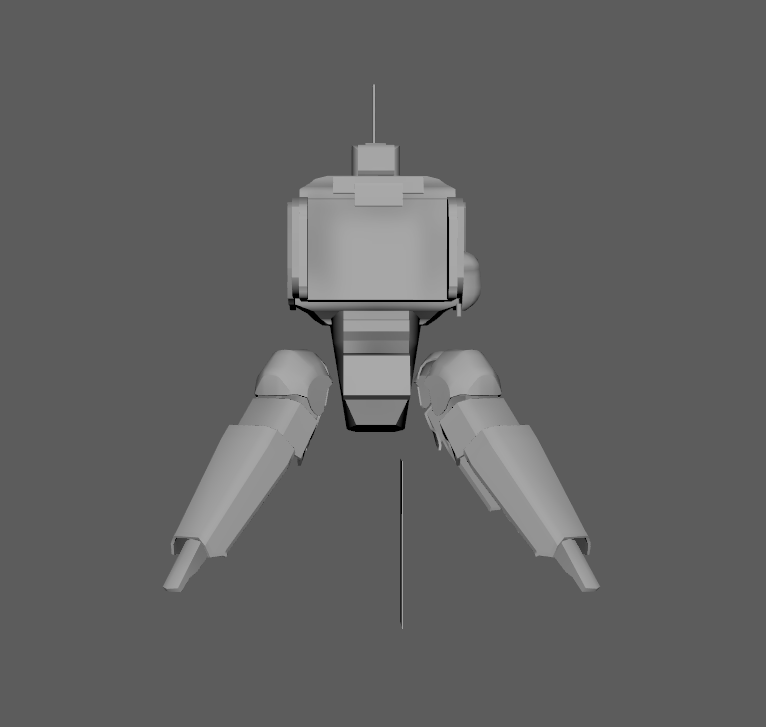
Here is the project as it stands, total poly count is around 100k tris including the base and total I want to be around 60-70k tris. More time into retopologizing the base and the walker will get me closer to the budget I initially set out for myself. 

My original concept by Gareth Davies:


Texture style goal by the same artist: 


Final textures in UE4


Sunday, August 1, 2021

Oculus Medium Research


Oculus Medium Research


For this summer research project I wanted to explore virtual reality sculpting. I looked into a couple of programs and focused in on Oculus Medium, that is now called Adobe Medium. For the purpose of research and implementation I did not update the original program to the Adobe version to get a basic understanding of the original program for Oculus. While researching and jumping into the program blind I found a lot of helpful and interesting features that Medium provides for digital sculpting. In this brief research paper I will cover a few topics, first what is medium and how it works, why did I want to use this program and what will I use it for moving forward as a 3D digital artist, and some references and artists that I’ve come across while researching and using Medium.


How it Works and Main Features


When I jumped into medium my first impression was that of frustration. There is a short 6 part tutorial on how to use the basic functions of the program like how to pull up the brushes and use stamps, how to capture video and basic layer functionality. I did have some success with just clicking through menus and having a knowledge of other 3d modeling programs. But I did find a great youtuber series that goes into greater detail if you want to jump into the program. I wont go through all of the features but just a few of the basics to get you started in the program.


Main Menu and Tutorial select


Transform Setting Menu


    Jumping in you have your two oculus controllers, one will be your active brush and the other will hold your menus and alternative brushes. There are a variety of brushes, your basic sculpt brush that adds geometry in the air or onto an active surface, a cutting tool to split a sculpt into multiple pieces, a smoothing brush to reduce details, a move brush, a flatten brush to get smooth planar geometry, a paint brush to adjust color, inflate, and corkscrew brush that pulls geometry out in a spiral pattern.


 With just these tools you will be able to start sculpting and creating models but there is also a menu of stamps and brush setting for each type of brush.


Clay Settings and Stamp Selection


     There is a large library of stamps that come with the progam initially. There are mechanical pieces, standard shapes and even human anatomy body parts and multiple facial expressions. But medium has the ability to add and share custom stamp libraries to get you started with basic shapes to jumpstart your sculpt.


    Some of the main features of the program that are similar to other 3D modeling programs is the ability to do multiple transforms such as scale, rotate, and translate. You also have layers like photoshop where you can adjust the resolution of the clay sculpt up or down, duplicate, rename etc. You can also adjust your environment settings to something you are more comfortable with. You have the ability to adjust the sun color and brightness in the scene, you can toggle the skybox and ground plane on or off and you can even add a bloom effect. Along with this you are able to adjust the material of each of the sculpts per layer to a default material, metallic or emissive and adjust each of the materials diffuse color, occlusion, and specularity.

Color Selection


     There are simple rendering options in Medium as well like adding lights to your scene and being able to export shots directly from your headset view or a camera on your free controller. If you were interested in exporting your entire process there is an option to record and export video as well. 


Why I wanted to use Medium, and how I’ve used it so far


I wanted to get into medium because it combined multiple interests of mine, I like traditional sculpting, as well as digital sculpting in Zbrush, and I want to learn more about VR in general. I did try Gravity Sketch briefly but that program was more nurb based modeling and I wanted a more traditional sculpting feel to create VR experiences and models. 


For the last project of the semester I decided to use Medium to create a proxy base for a robot walker that I created in Maya. I used a variety of stamps and the clay and smooth tools to block out a simple rock and sand base that I will continue to sculpt and refine in Zbrush.


Rock Base in Medium


     In the future I would like to create full VR environment proxies or full sculpts in the program. I could also utilize the sculpts to do paint overs in photoshop and I would like to continue practicing in VR to get better at hard surface modeling. My main goal moving forward in the fall is to use medium and a proxy program for 3D printing. Since 3D printing programs are able to handle higher density models, and I am able to adjust resolution directly in medium and decimate directly through export, this could be a quick and new way to create physical 3d prints with higher detail.

    Overall I am excited and eager to use Medium more and explore new ways of modeling. There are a lot more tools to learn and I look forward to updating to the latest version of Adobe medium now that it is integrated better into the adobe suite as is Substance Painter.


Project 03: Week 03 Textures

 This week I am behind but all other work for the other classes are completed, so I have the next 3 days to get the final sculpting for the base done, textures and finalizing the textures for the walker. here is where I am so far: 


 I also had an alumni Joseph Denike rig the walker so now he is pretty poseable and I will be able to pose him in multiple poses or even animate him if I wanted to.


Sunday, July 25, 2021

Project 03 Week 02: Proxy End and Base Start


For this week I wanted to finish the proxy for the main robot and start / finish the base and fell a little behind on the base. Here is where I am at with the walker and plan on doing some high rez edits in maya and a bit of boolean work to get some more mechanical looks to the main metal skeleton. 


Original Concept: 


Side 01


Side 02


Front


Back 


Top


Top Angled


Angle Wire


Bottom Wire


Base Proxy Sculpt in Medium


Decimated export into Maya: 


Scale with Walker


Tuesday, July 20, 2021

Corpse Bride Sprint 05

 For this final sprint it was just mostly polish for me. I moved some pieces around in the main level bar scene so that it would be easier to grab things off of the bar as well as place new curtains in the door way with the proper textures on them that Yami made. I adjusted the lighting to brighten the overall scene and I drew some simple png variations of butterfly for Abi's vfx for Emily's exit of the main level. 


Adjusted the position of the bar and its contents closer to Emily within the bounding box of our play area so that it was easier to grab the bottles and beer stein off of the top. 


I also adjusted the solid blue butterfly for something that resembled the film better for Emilys final exit from the main scene. Abi has already adjusted the vfx to have both of the new pngs show up once you've successfully completed the key presses on the piano.


Sunday, July 18, 2021

Project 3 Week 01: Schedule and Proxy Start

 For the final project for the summer I decided on a concept art by Gareth Davies of a robot walker. This project will definitely require more proxying and thought because there is only one one view and the concept has some conflicting structures. I plan on completing the robot in maya and the base that the robot will sit on will be  simple desert scene proxied in oculus Medium and finished up in zbrush. 


Here is the original concept:


I did a very simple sketch for what I would do for the top / front views but I want to take this week to flesh out in more detail what all of the center torso is made up of as well as the two guns that protrude from the front of the walker look like. 


I collected a few references for how mechanical parts fit together and how I could incorporate them into this concept:


My schedule will require more time for the proxying process so I am taking two weeks for proxy / layout and game res, one for high res edits and then the final week for texturing and presentation. 


Here is my progress so far: 


Sunday, July 11, 2021

Tranquilizer Gun Week 04

 For this week I finalized textures and set up the lighting in UE4. Here is where the project stands: 

I had some issues with the lighting being built but here are my final textures in UE4 with an asset pack particle for the rings and a simple moving material for the nebula effect I made: 


Original Reference:


Substance final texture: 


Different lighting in UE4


Updated Textures in Substance Painter: 


Project 03: Week 04 Final Presentation